Share
Sign In
What's new? ✨
Keep up with new features, bug fixes, and news that empowers you in using SlashPage!
SlashPage for Desktop out now!
Get real-time notifications on your desktop 💡 Have you found it inconvenient not being able to quickly check SlashPage notifications when you're doing something else on your computer? With the SlashPage desktop app, you can stay updated on new activities in your site / community and respond right away. Make sure to click Allow notifications on the first notification you receive! If you miss that message, go to the notification settings on your desktop, find Slashpage, and allow notifications. Multitask with multiple tabs in a single window Do you want to work on different pages and channels at the same time? Do you manage multiple sites with one account? You can keep multiple tabs open in the SlashPage app. If you're tired of juggling other sites in your browser, the desktop app lets you manage SlashPage sites separately. Tip. You can also use keyboard shortcuts! Most of them are the same as you would use in a browser. You can check the available shortcuts in the top menu or SlashPage guide. Mac Windows Try the desktop app and see how much more convenient it is! The download will start immediately after you click the button.
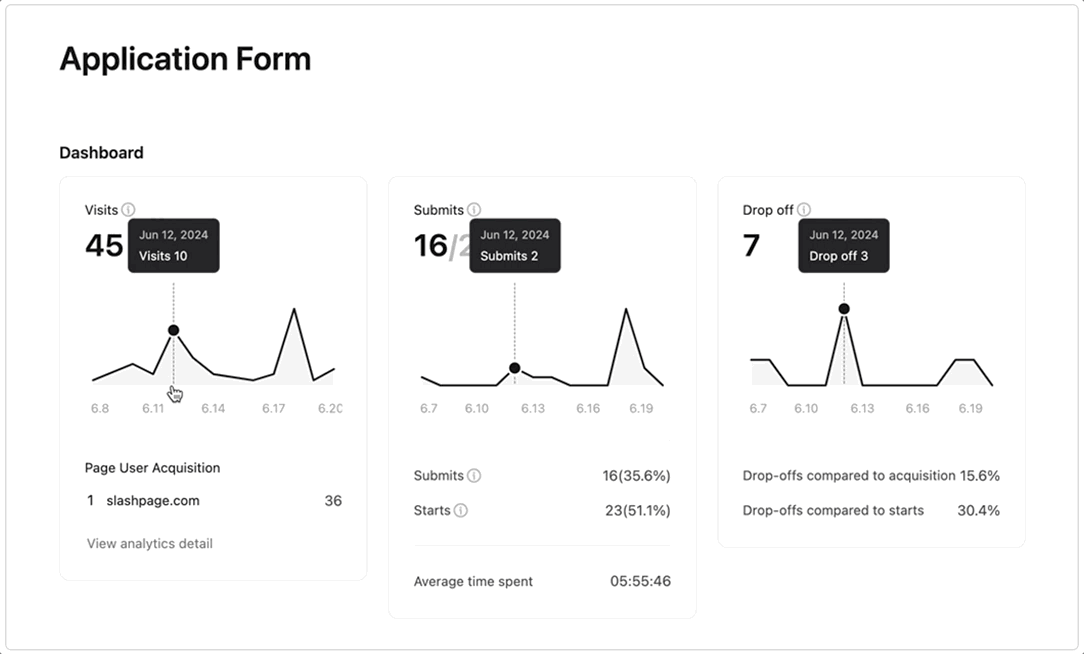
SlashPage
1
😍💚👍😆
4
3 new features to make better use of your Image Sliders! 🌠
You can indicate which image is currently viewed. You can easily check the current position in the image slider through the indicator. Click ••• > Indicator > Use in the top right corner of the image slider to enable it. Choose your view type: One by one vs Multiple The one by one option has been newly added to the image slider view type. One by one view type One by one view type is useful when you want visitors to focus on one image at a time, such as for a portfolio or product showcase. Only one image is displayed at a time, and the size of the slider changes to match the size of each image. Multiple view type Multiple view type is useful when you want to show multiple images in sequence, such as creating a site banner or showcasing the progress of a project. You can adjust the space between images as you like. Choose from None, Default, Wide, or adjust the image spacing in pixels using the custom slider below. Note: Image spacing can only be adjusted in a multiple view type. Search results for user mentions now appear based on relevance (post author, commenter). When duplicating a channel, posts within the channel are no longer duplicated.
SlashPage
👍
2
Track your form metrics: Visits, Submissions, and Drop-offs 📝
Dashboard has been added to the Form channel You can find the dashboard in the Summary tab of the form channel. You can check visit, submission and drop-off metrics Visits: You can see how many visitors viewed your form and which source they come from. Note: If a visitor comes to the form after visiting your site, its acquisition funnel will be marked as slashpage.com. So if you want to track your funnel more accurately, try sharing the form channel link directly. Want to share your form link in a cleaner way? Try Clean URL! Submits: You can see how many responses were started and submitted. You can also check the average time spent to complete the form. Drop-off: You can see how many people have dropped off your form. You can review both the drop-off rate relative to the page acquisition and the drop-off rate relative to the number of starts. You can check both completed and uncompleted responses in the Results tab. In the Results tab, you can review the unsubmitted responses by clicking Uncompleted to see which questions each respondent didn't answer. If a question has a particularly low response rate, you can consider revising it and asking yourself questions like, "Are people dropping off because the question requires sensitive information?" or "Are they feeling like the form is too long because it's broken into several pages (steps)?" If you want to learn more about how to use the Form channel, check out our guide!
SlashPage
👍
1
📈 Upgrade your site with our latest features!
SlashPage gets a whole new look Here's a quick overview of the three most important changes. Separate content on your site with sections Section is a feature that allows you to organize content within your site. Manage pages and channels by dividing them into sections within a single site. Especially if you don't like having all of your pages and channels on your site home! Simply put the pages and channels you don't want to see on the site home in a different section. You can manage them in other sections so they don't show up in the landing page. Tip. Keep what you're working on in the Private section When you create a new page or channel on your public site, have you ever worried that people will find it unfinished? Or do you want to keep content on your site that you don't want to share? If so, you should try the private section. Once you've finished a page or channel in a private section, you can easily drag it to any public section of your site. Add a top navigation bar The top navigation lets you put the pages and channels you want to feature at the top of your site. The top navigation is divided by section, and the top pages and channels within a section appear in a drop-down menu. Site Profile: You can set your site name, the font of your site name, whether to capitalize the first letter, and a favicon. Section: Add a section by clicking 'Add section' in the left sidebar or top navigation bar. Switch between view mode and edit mode: Click the pencil toggle to switch between view mode and edit mode without opening a new window. All settings are available in the Settings panel on the right. The settings menu, which was previously separated into the left sidebar, top toolbar, and top right menu, has been integrated into the Settings panel. You can manage page settings, design (theme), and site settings all from the right settings panel.
SlashPage
👍
1
Form Channel with a simple, customizable design is out now!
Creating a survey form is really straightforward with SlashPage. From attracting new users or collecting feedback to surveys that require different types of responses, get started with the Form channel. Engage with users, collect responses, and manage form results all within one site. Customize your form any way you want The best part about SlashPage Form is that it's highly customizable. You can change the cover image, theme, form width, and more. You can also insert blocks like buttons, callouts, images, and videos to include references and instructions to help guide your survey. You can also edit the page that appears at the end of the form Click Edit completion page at the bottom of the form to customize it. Question types you can add You can add a variety of question types, including short and long text, email and phone number, choice • checkbox • dropdown to create multiple choice questions, and even a file attachment box. More question types will be added! You can adjust the form settings in the Results page In the form channel, you can adjust the detailed settings in Results > Settings. You can start and end the survey, set a scheduled end time, limit the maximum number of responses a survey can receive, and limit a single submission per user. 💡 Download the SlashPage App to get a push notification when a new response is submitted.
SlashPage
👍💚👏
4
Organize your posts, to-dos, product development roadmap, and more with Kanban channel!
You can categorize your content by status. Are you looking to better manage your writing process? Or do you want to organize and showcase your service/product development roadmap on your site, but don't know how to do it? Kanban channel allows you to organize your tasks according to their progress. For example, as shown in the image above, you can display your tasks according to the status of the tasks such as To Do, In Progress, and Done. What is 'Field'? Field is a feature that allows you to add attributes to your posts, such as status, last modified, check, or assignee. You can sort and filter by field to view and display posts in the order you want, or just the ones you want. 1️⃣ Sort: You can sort posts in ascending or descending order by selecting specific fields. 2️⃣ Filter: You can set filters to show only posts that meet certain criteria. 3️⃣ Field: You can add and delete fields, edit their names, and set them to be visible/hidden. Here's how we use it. We've made our SlashPage roadmap with the kanban channel. Tip. You can also switch a kanban channel to a list channel. Type /kanban — select the kanban channel and add it to your site now! 1. You can paste tables from other apps! Copy a table from Spreadsheet, Excel, Numbers, etc. and paste it into SlashPage. The table will be automatically formatted.
SlashPage
👍
2
The simplest way to organize your content: List channel!
You can display your posts in a list format, with specified fields Have you ever struggled to organize various content in a single space, but didn't know how to categorize it? From simple notes to articles, documents, and more, the List channel is the place to start. You can add a variety of fields to organize them by their features and status. What is 'Field'? Field is a feature that allows you to add attributes to your posts, such as status, last modified, check, or assignee. You can sort and filter by field to view and display posts in the order you want, or just the ones you want. 1️⃣ Sort: You can sort posts in ascending or descending order by selecting specific fields. 2️⃣ Filter: You can set filters to show only posts that meet certain criteria. 3️⃣ Field: You can add and delete fields, edit their names, and set them to be visible/hidden. Here's how we use it. We organize drafts for What's new in the list channel. Tip. You can also switch a list channel to a kanban channel. Type /list — select the list channel and add it to your site now!
SlashPage
😍👍👏
3
Now you can change the size and weight of the text! ➕➖
Have you ever wanted to change the text style when customizing your site? Or maybe you want to increase the size of a text block that is not used as a heading, but you still want to emphasize it? Then pay attention! You can now adjust the size and weight of text per block. Per block? When you style text, all text within a block can only be the same size and weight - you can't make some text in a block bigger and some smaller! How to adjust text size and weight (Check image above!) Click on the block and hit esc, or click on the handle to the left of the block to open the black toolbar. The size of the text can be adjusted by 1) dragging the slider on the toolbar, or 2) typing in the font size you want. The weight of the text can be adjusted by pressing B and selecting one of the options. ✔️ The text size can be any size from a minimum of 12px to a maximum of 100px, and the text weight can be one of five options Note: The default size for text is 16px and a medium weight. Not all the text can be adjusted 🙅‍♂️ Text size and weight are adjustable only in text, quote, and callout blocks. If the text is either 1) fixed in size or 2) affected by other UI, such as in a title or list block, it can't be adjusted. Therefore, clicking the handle of these blocks will not open the toolbar. Text in columns and tables is considered a text block, so you can change its size and weight. ⭕️ Bug Fixes Fixed an issue that email notifications for new posts would not be sent. Adjusted image size in email notifications for new posts to appear larger.
SlashPage
❤️👍
2
Now you can adjust the margins on your site!
If you use Enter to adjust margins but don't like it... 🧐 Find it inconvenient to adjust margins with line breaks, or can't get the exact size of margin you want with line breaks? Then try the Spacer block, which lets you add margins all at once! Simply drag the block handle to adjust the height of your margin. Don't worry! The margin block will look a different color from the background color in edit mode, but in view mode (= to site visitors) it will appear the same color as the background color. Bug Fixes and Improvements When you add a feature with /, you can now see search results in order of relevance to the feature you're looking for. When you duplicate a channel, the content inside the channel will be also duplicated, not just the format. Fixed an issue that the screen would automatically scroll to the bottom of a post when there was a tab block. Fixed an issue that the signup window would not close when you stopped the signup process in the login page.
SlashPage
👍
2
SlashPage Guide out now!
Discover the features and tips you need to create and manage your site! Want to find out what features you can add to your site and how to make the most of them? Ever felt tired of asking questions and waiting for answers? If so, check out SlashPage Guide! The features are explained in detail but in a simple way. Even if you're not familiar with Slashpage, you'll be able to understand in no time. You can also access the guide by clicking the button at the bottom of our official site. If there's a feature you're curious about, just search for it You can explore various features in the sidebar, but if you're looking for something specific, you can quickly find it with a search. Click ••• → Search at the top right of the site or use the 🔍 shortcut (Mac:cmd+k|Windows:ctrl+k). You can also click the table of contents within the guide pages to jump directly to what you're looking for. You can also switch to other languages by clicking the 🌐 English button at the top right of the site! Preview our upcoming multilingual translation feature. Slashpage Guide will be constantly updated. So if you're interested, subscribe for updates! If there's a feature you'd like to see in the guide, let us know in our feedback channel! You can also create your own guides!
SlashPage
👏👍
2
Use Tab block to organize different types of content!
Now you can display different types of content in a single block with separate tabs. Add, delete, or reorder tabs as you wish. You can also rename tabs by clicking on them. You can put text, images, buttons, and even pages and channels inside tab blocks. If you've already created something, drag and drop it into a tab block or just copy and paste it. You can change the layout of a tab block by clicking on ••• → Card Shape at the top right of a tab block! We've summarized this week's new features and bug fixes in a tab block. Hit the bug fixes tab! Features Page Preview: You can preview what's inside a page when you hover over it. You can now add Unsplash images to the Image Block and Image Slider. Bug Fixes Fixed an issue that background colors would not be applied to inline-type channels. Fixed an issue with mentions after (, { symbols. Fixed an issue that the comment input field would be only partially visible on Android mobile view. [Beta] Fixed an issue with multi-choice in a select-type question of a form channel.
SlashPage
1
👏👍❤️😆
7
You can now create a template for channel posts! 📥
Do you want your members to write posts that follow a certain format? Are you tired of copy-pasting and editing every time you write posts of the same format? Now with the Custom Template feature, you can create your template in the channel and set it as the default format for the posts. Currently only available in Blog and Gallery channels. We're working to make it available in Pages and other channels soon. [Beta] Custom templates are also available in List and Kanban channels. How to create a template In your channel, click V to the right of Post and click Create template. When you're done editing your template, you can save it with Save template in the top right. Please note When you're editing a template, you can see "You're editing a template" at the top. How to set a template as the default format for a post Click ••• to the right of a template and click Set as default. When you start writing with Post button, the default template will be applied to the post. How to efficiently work with multiple templates Writing different types of posts in one channel? Create a template for each type. Tap V to the right of Post and select the template you need to quickly write your post.
SlashPage
2 reasons why Channel got even better 📢
We've made two improvements based on your feedback! 1. You can now pin channel posts Do you have a post that you want your subscribers or visitors to see first? Did your old announcement get pushed out by newer posts, but you want to keep it at the top of your channel? Now, just pin them at the top of a channel! You can pin as many posts as you want in any channel. Tip. You can preview your pinned posts by clicking 📌+number. 2. Visibility and permission setting got much more intuitive Wait, do you have a channel set to public that only site admins should see? Or a channel that everyone should be able to interact with, but only logged in users can post and comment? Now you can set your channel's visibility and post/comment permissions with a single click in the top right corner of the channel! This works the same way for you sites or pages. You can easily set them up in inline-type channel as well SlashPage gets better and better everyday thanks to your feedback. If you have any new features you'd like to use, suggestions, questions, or other requests, feel free to leave them in the SlashPage Feedback Channel!
SlashPage
👍
1
You can now transfer ownership of your site!
Have you ever had a website admin change and needed to change the owner of a website? Now you can transfer the ownership of your site to a member with the Transfer Ownership feature. There are 2 ways to transfer ownership Site permissions only Selecting "Site permissions only" changes you to a member with "Can post / comment" permissions and transfers ownership of the site to the member you choose. In this case, the only thing that changes is the owner of the site. Including your activities Selecting "Including your activities" changes not only the owner of the site, but also the existing owner's posts, comments, reactions and direct messages to the member you choose. Example: When A (the site's owner) transfers ownership of the site to B (a member), if A selects "Including your activities", all posts, direct messages, comments, and reactions that A created within the site will be changed to B's after the ownership transfer. Note: The ownership transfer is completed when the person taking over ownership accepts the request in the notification menu. What's the difference between owners and members who can manage? Site owners are now visible in the Members menu. Let me briefly explain the difference between site owners and members with "Can manage" permissions. Site owners can manage site settings such as Search engine optimization (SEO), duplication permissions, and site name, while members with 'can manage' permissions can only modify the visibility setting and manage internal activities such as members, subscribers, and posts published in the site.
SlashPage
😘👍
2
Check out the Feature Preview to see what's available!
💡 Now, you can preview feature descriptions and examples before adding blocks! We've added a window where you can see a functional description and example of a block before adding it to your site. Check out the feature preview by clicking the Add button in the toolbar on the top or the + button on the left of a block. If there's a feature you're looking for, you can 🔍 search for it in the preview window. Scroll through the list of blocks on the left to see what's available. If you look carefully, you might find something that makes you go, "Huh? I didn't know this, this looks great!" Once you've found a feature you want, you can add it to your site by clicking + on the list, + Add button at the bottom right, or Enter on your keyboard.
SlashPage
👍
4
Create a 'Feed' Type Community: Where Multiple Users Can Post Together!
🙌 We've improved the Feed Channel for Better Communication Simply type / and select Add Channel → Feed to create a space like Twitter or Facebook feeds, as shown in the animation below. Feed encourages members to post more often Feed channel defaults to short, untitled posts, so it allows members to post with much less effort. Why not let them know they can instantly share news or thoughts whenever they want? People can access information faster with Feed Users can quickly scroll through the content, and react and comment by clicking buttons at the bottom of each post. Preview the Latest Posts with Inline Type You can set up your channel in Inline type to show only the most recent posts like below. Once you've set up your feed type community, it's time to invite people to join! Learn how to invite members with different permissions
SlashPage
👍
2
Upgraded Drag-and-Drop Makes Editing Easier!
🚀 SlashPage Just Got More Convenient with Upgraded Drag-and-Drop We've improved our Drag-and-Drop feature. Adjust the hierarchy between pages & channels, move content blocks to different pages, and even move posts to different channels with a single click. This is how we've made things easier for you Adjust the hierarchy between pages/channels in the sidebar You can now easily change the hierarchy between sub-pages or channels by dragging and dropping them in the sidebar. Want to switch up the order of pages or channels? There’s no need to go to the parent page anymore; simply grab and move them in the sidebar. Move a block to different pages You can drag and drop blocks of content to other pages and channels. Now you can easily move blocks of text, images, videos, and more to wherever you want. Move posts between Blog, Feed, and Gallery Want to move a post published as a Blog type to Feed? Or maybe you’ve uploaded pictures to your Feed and now think, "Hmm, these might be better in a Gallery 🧐"? Now you don't have to rewrite the same thing on a different channel anymore. With the upgraded Drag-and-Drop, you can move posts between Blog, Feed, and Gallery. When you want to reorganize content in a new structure, just drag and drop! Please Note When moving posts, notifications may be sent out according to each channel's "send notification" settings. Please check the notification settings in each channel to ensure they are set as desired before moving your posts! Here's how you check Notification settings 👇
SlashPage
👍😀
2
Collaboration Just Got Easier with Collaborative Editing!
🚀 Work Together, Easier and Faster You can now edit pages together, simultaneously! Edit pages, share updates, and exchange ideas in real-time with the team members you're working with! 🌟 Useful in These Situations Fast Website Building: Now you can have multiple users edit your website together and at the same time with Collaborative Editing. Invite your team members to work with you! You'll spend less time building your website. Team Projects: When multiple team members need to work on the same project, you don't have to wait for each other to finish their work. Edit different parts simultaneously, save time and maximize efficiency 📈. Immediate Feedback and Revisions: One place to write feedback, another place to reflect? 🧐 With Collaborative Editing, you can get real-time feedback on the same page and jump right into revisions. Feedback and revisions, all in one place, all at the same time. Share Ideas: Have you ever experienced a brainstorming session where ideas are flying fast? Sometimes it's hard to figure out how to organize them all. Collaborative Editing is a great way to share and develop ideas with multiple people. You can organize your thoughts in the same space and share them all together. ✨ Collaborative Editing, it's super easy! Editor Live Cursor: The editor live cursor shows you where each member is working during collaborative editing. You can see at a glance where each other's working, minimizing duplication of effort, confusion, and errors. Auto-save: Don’t worry! All changes made during the editing process are automatically saved, so you don't have to to hit the save button. Invite your team members and start using the Collaborative Editing Right Now! How to Invite Members to Your Page See Details (Guide)
SlashPage
👍
3
Introducing Presentation to make your memos look like the slide deck! 💁‍♂️
Don't bother transferring notes, idea memos, or handwritten materials to PowerPoint! Turn the pages that were just memos directly into presentation slides. It looks neat without the need for detailed design! 4 Reasons Why SlashPage for Presentations is Great ✔️ 1. Every element, from image sliders to toggles and buttons, works exactly the same in presentations. Even with a large number of images, you can efficiently display them without adjusting spacing or alignment. Toggles can be opened and closed, buttons can be clicked, and all other elements operate just like they do on the regular page! 2. Scrolling within a slide is possible. Have you ever struggled with fitting a lot of content into one slide? With SlashPage, even if there's plenty of content in one slide, you can scroll to show everything! 3. Sharing your slide deck becomes easy. Worries like "Is the PDF file size too large?" or "Will the font break?" are a thing of the past! Simply share the page link, and the audience can easily view your deck. When there's a large audience, you can even display a QR code on the presentation screen. How to download QR code image in just 1 second Click the share icon in the upper right corner of the screen to download the QR code for the page as an image (SVG or PNG) file! 4. You can track the engagement on your presentation pages. Explore metrics such as the number of visitors, and button clicks, and even identify which slide grabbed the most attention. If you create a Q&A channel, you won't miss any questions before or after the presentation. Try it on your page right away! Click on the top right corner ・・・ > Presentation. The slides are divided by title or divider blocks, and you can navigate by clicking on the left/right of the screen or using the arrow keys.
SlashPage
Now you can send DMs! 💬
Are you managing web pages such as Q&A, personal branding, or event pages that require direct messages with visitors? Now, you don't have to go back and forth between your page, email, and social media to communicate with visitors! You can directly send direct messages on your page. Add the DM button in noticeable areas such as below the inquiry channel, your main projects, and event notices! Add a button and configure the 'Send DM to (site owner's username)' feature. Do you want to talk to the page manager personally? You can now directly convey inquiries containing sensitive information to the manager or have casual talks without sharing phone number with other members. Click on another member's profile image in the channel, select the 'Direct Message' button, and start chatting instantly. 3 ways to effectively use DM! Want to see previous messages with someone? Go back to the site where you initially sent or received messages from that person. Utilize the SlashPage app to check messages more promptly. New message notifications are delivered to the notification center, not by email. Be sure to check notifications carefully so you don't miss any messages! Similar to chat channels, you can react to messages, leave comments, or even schedule messages. Want to give it a test? Let's try it together! Click the button below and send any message. For example, what's for lunch today? 🤔
SlashPage
❤️👍
2
You can change the link preview layout! 👀
Have you ever encountered these issues when sharing links? "The preview thumbnail is too large and disrupts the flow. I wish it was smaller." "I want to embed it, but all I see is a gray box." "The thumbnail image gets cut off." Now, you can choose from 4 different preview layouts! When sharing maps or videos, you can embed the content to be visible. Choose either the large image or small image preview and apply it uniformly for your content. Click the triangle toggle to preview how it will look! Preview Large Image Small Image No Image You can change it with just a few clicks!
SlashPage
👍
1
Easily Unify Button Colors with the Color Dropper! 🎨
Don't spend any more time searching for the color code! Searching for the desired color code, applying it to every button, copying the color code again when modifying, and applying it to every button again... This has been too complicated! 🤯 With the color dropper and palette, you can now easily match all the buttons to the same color with just a few clicks, even if you have many buttons. Extract color from anywhere on your screen with the color dropper! Extract color from anwhere: the page you are writing, Google results in another window or desktop, and more! With just one click, match button colors to the logo or other elements on the page. Find the colors used in theme and recently used colors in the palette! If you want different colors for each button, choose a color from the Predefined Color palette that fits well with the current theme. You can also quickly find colors previously applied in the Recent palette.
SlashPage
😀
1
Now you can duplicate any sites! 📑
Try duplicating your favorite SlashPage. 💕 When you find a SlashPage site that you really like. 🤓 When your site is too good to keep to yourself, and you want to share it as a template. 🎨 When you want to use existing colors and layout of your site's branding, community, landing pages the same. Duplicate a site with just a few clicks. First, enable duplication to make your site as a template. Click on Site Settings > Allow duplicate as template ! To duplicate your template, click on View mode > top right of the screen ・・・ > Duplicate as template. All elements, excluding comments, have been duplicated to create a new site! The site must be Public for others to duplicate! Also, even if the site is public, any members-only subpages/channels will be excluded from the duplication. Found a site that you really like, but it isn't duplicatable? Send a direct message to the site owner to enable duplication as a template. Tip: Want more people to use your template? The 'Templates' menu will soon be added to Discover, visible to all SlashPage users. It will showcase templates you've created, not just those created by SlashPage! If you want your template to be seen by more people, create it now and set 'Allow duplicate as template' under site settings.😊
SlashPage
😘👍
2
Writing a test post? Turn off notifications! 🔕
Have you ever wanted to write a post but didn't want to notify subscribers? 👀 When you just want to check if the content looks the way you want 🔗 For channels where you collect links or materials to view later 📑 When posting multiple articles at once Before publishing, please uncheck Send notifications to users in the confirmation popup. This option will be retained the next time you post to the channel, and you can turn it back on at any time! In the confirmation popup, you can also see how many people will receive notifications when you publish the post. Even if multiple people write in the same channel, the options are saved individually! e.g., You can set your options to only send notifications when posting as the admin account and not send notifications when posting as a member account. You can also see the number of people who will receive notifications while writing! Please check the Notify to 00 users on the left side of the publish button.
SlashPage
Add a table of contents to your page! 📄
Add a table of contents when posting lengthy or crucial information. You can offer a glimpse of your page's content and enable users to skip directly to each section. Turn on the Table of contents in the Custom menu at the top of the editing screen. Headings 1, 2, and 3 blocks are automatically added to the table of contents! Try implementing table of contents in your service guides or manuals! It allows customers to swiftly navigate to the sections they're interested in. It's also suitable for documents like meeting minutes or proposals that require an overview at a glance. Depending on your screen width, Table of contents might appear on the right side of the page or just below the title. Tip: For better guides, Copy links for individual blocks! In addition to adding a table of contents, copying links of individual blocks ameliorates your guides. For instance, create a link in a guide document that directs to a specific block in another guide, like 'Click here to see how to view only the posts you've written!' Edit Mode: Click on the handle of the desired block, and select Copy link to block. View Mode: Click on the desired part of the table of contents, and copy the link from the address bar.
SlashPage
👍
1
Online business owners, try this shopping block!
Simply paste the product link, and a page similar to an online store will be created. 📈Using shopping blocks, boost search traffic to your products. 👀 Spotlight flagship products and introduce your brand. 🛍️ Easily craft your unique shop's layout and design with a simple copy + paste. If prices change during a sale, update the product information by clicking ∙∙∙ > Refresh Link Preview in the top right of the block. Moreover, If you want to explore other preset styles, changing the theme will alter the design! The Shopping Block is available for products on Amazon and Shopify. (We plan to expand the list! If you're selling elsewhere, let us know in the comments.) Wait a moment! Buttons that lead directly to calling or texting are available too. Simply add tel:0123456789 or sms:0123456789 to the button's link!
SlashPage
3 Updates to make your blog easier to read!
1️⃣ Now you can add a cover image to your blog posts. Using a cover image can enhance the communicative power and comprehension of the content. Whether it's a travel journal, an introduction to a no-code tool, or valuable financial tips, try adding cover images that match your post's content or theme! 2️⃣ You can apply 12 different background & text colors to Callout blocks. Color options that will make the Callout block stand out have been added. Customize the colors to match your content—whether it's tips, Q&A, examples, or to align with your brand! Feel free to use emoji that are relevant to the content. Use 📢 for announcements, 🚨 for warnings, 🍯 for valuable tips, or express heartfelt sentiments with ❤️💛🩵. 3️⃣ The text and images in posts are now optimized to fit the browser width. We've applied responsive web design, allowing them to naturally adjust or resize based on the browser width. Whether it's a post with lengthy articles, columns, or images, it's much more comfortable to read now!
SlashPage
🎊👏😀
3
Finally, you can see your subscribers list! 😲
Did you ever want a little more than just the subscriber count? Now, with just one click, you can access the complete list of your subscribers! Discover when they subscribed to you and when they last visited your page. The Subscriber menu is located at the top of the left sidebar of the screen. You can also access the Member menu together. Only members with management permissions can access the subscriber list. The subscriber and member management features will continue to improve in the future. Feel free to share any ideas in the comments! 💬
SlashPage
2
The sidebar just got better! ✨
Now, you can create sites like these with SlashPage! 📑 Complex guide documents with many subpages 💬 Community covering various topics ✍️ High-publishing blogs or information-sharing pages 1️⃣ It's easier to know the relationship between channels and pages. We reduced the empty space on the left of the list and added vertical columns which aids visualizing the relationship! 2️⃣ Easily locate the position of the channel and page you are viewing. When you click on a channel or page, the sidebar automatically adjusts to the location of the channel of page. 3️⃣ Finding site settings, drafts, and deleted pages has become more convenient than ever. We brought out the Site settings, Drafts & Scheduled, and Trash menus to the top of the sidebar. (Note that each menu may not be visible depending on the permissions of the site you are viewing.) 4️⃣ Applying icons to pages makes them stand out more. It removes the default document icon that was visible on pages without icons.
SlashPage
👍
2
Now you can easily turn text blocks into pages! 🪄
Tired of creating multiple pages? Previously, you had to go through the process of creating a page → clicking onto the page and writing the title → going back, and creating a page again. Now, you can simply write multiple text and click the Convert to Page option, and sub-pages are instantly created! 🧚 Try it out in these situations: ✅ When you want to efficiently write documents with a table of contents, such as product guides or FAQs. ✅ When archiving a large amount of information, such as projects, educational materials, or restaurant lists. ✅ When brainstorming ideas before writing down the contents, such as website interface structure, or service introductions. Tips. It works for all text-based blocks like titles, toggles, and ordered lists. You can select multiple blocks with drag or Shift+Click to convert them all at once.
SlashPage
1
👍
1
We've applied responsive web design! 🖥️
Have you ever seen content appear as if it's cut off on the web browser? Now, the content is automatically optimized for the screen that highlights it the best, depending on the width. This feature is especially useful on pages like: ↔️ When text or images fit perfectly within the screen width. 📑 When there are many sub-pages such as design materials or restaurant lists, so you need to create columns. ✨ When you want to neatly arrange menu buttons or content in columns on the homepage. However, this feature is not yet applied within the channel, so text or images may appear cropped. We are working hard on development and your patience is valued! 🧑‍💻
SlashPage
Now people can leave comments on your pages! 💬
If you want to communicate on pages for introductions, information, events, etc., ... 🗣️ Add a comment section now and start talking to your visitors! ✅ When introducing a service or event on a page, you can communicate with customers instantly in one page. ✅ When adding lots of contents like guides or restaurant collections, simply include a comment section on each page to gather feedback. ✅ The comment box field is fixed on the bottom of the screen, allowing users to leave comments while browsing the page. To enable comments on your page, click the Custom button at the top of the screen! Tip: control who can comment on your page: Click ••• in the top right corner of the screen. Select Page settings. Go to Member/Permission settings. Choose the scope of people who can leave comments.
SlashPage
👍
1
Improved chat channels for better conversations! 🧐
Ever felt inundated by too much content in messages? If so, we made two improvements. 😎 ✅ In threads, pictures are now smaller, so even if there are many, they don't take up as much space. ✅ You can edit your messages on the side bar while staying in the channel.
SlashPage
Added 'Themes' unaffected by system settings!
"It didn't appear in this color on my computer!" You added a dark-colored button to stand out on a white background, but what if the user was viewing it with a black background in dark mode? How awkward is it! 😱 Try out the newly added 'Light Theme' and 'Dark Theme'! While the system theme follows the user's light/dark mode, the light and dark themes display based on my chosen theme, regardless of user settings. 📢 These themes were added thanks to contributions from @Steven and @BOOTH. Thank you for your valuable contributions! 💕
SlashPage
Try the improved BLOG channel!
Three changes to boost your blog engagement 📈 🔔 Profile cards have been added for each post to encourage subscriptions. 💬 Moved the comment section so that visitors can comment immediately after reading a post. 🔛 At the bottom of the page, you can find previous & next posts, allowing visitors to read more. Subscription applies to the entire site, and subscribers can receive notifications from other channels too! Besides your blog, consider operating announcement channels for sharing updates and chat channels for interacting with subscribers. (People can set different notification preferences for each channel.) Tip. If you want your awesome blog to appear in search results on other websites, consider the Share to Web option as well!
SlashPage
👍
1